Changing strings and staying in tune
|
I know this might appear to be stating the bleeding obvious, but do you really know how to re-string your guitar just before a gig and be confident that you're not going to have horrendous tuning problems?
I was very dismissive of this information which I found browsing through a guitar book in the library whilst waiting for somebody - seeing as how I'd already been playing guitar about 25 years at this point!
The main thing is to make sure the string does not slip at the machine head. So thread it properly so this just can't happen.
|
|
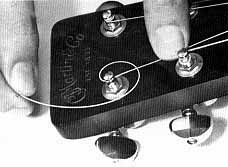
1. Thread the string through the hole:
|
|
|
2. After coming through the hole, wind the string halfway round the post and pass under the longer part of the string. Clockwise for the three bass strings; counterclockwise for the treble strings
|
|
|
|
|
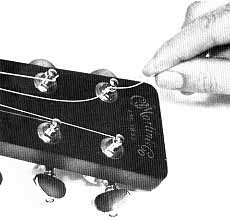
3. Bend the short end back over the longer part and then wind the string on with the machine head, taking care to keep it below the previous turn.
|
|
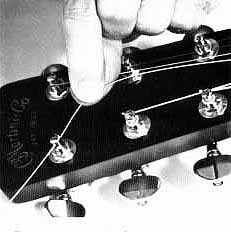
4. Tune the string up to pitch, preferably with the aid of a tuner.
Now there is a lot of natural slack that has to be taken up before you can bend strings without fear of the string slipping. So..
5. Bend the string with your left hand and press the string down with your right. The string will slip.
6. Retune to pitch and repeat the bending process as many times as is necessary for the tuner to read the same before and after your assault on the instrument.
N.B. Don't overdo it! Once it stays put when you have bent the string, don't keep doing it, because the string can actually go sharp as it contracts on its own!
|
|
|
Capos - staying in tune
|
Are you in tune until you put that durn capo on? My fifth tuned 12 string especially sounds hideous if it's out of tune, which happens frequently after you fit a capo.
You then have to spend valuable audience attention-span (usually none) time retuning and doing your nerves in to boot!
I use a Shubb capo (one of those little dinky cam ones) which has a well defined rubber pad, but this should work with most types:-
Place the capo accurately ON the metal fret wire itself. You'll then eliminate those unwanted string bending qualities.
N.B. Don't go too far over the fret or you'll damp the strings!
|
• Have a look at the excellent instructions below, which were emailed to me by Pete Jennings who was rushing about distributing leaflets about this - spreading the word like a new gospel!
Capo - Preserving Tone & Tuning
Placing a capo on an instrument is a very delicate thing and should be done with great care. Too many musicians are unaware of this, resulting in 1) muffled tone or 2) bad tuning. These two conflict with each other and the quest is to find the optimal compromise. On stage there is no time to retune. Let's take a closer look on how a capo works:
|
 |
This placement, behind the fret, bends the strings over the fret. The strings are pressed down against the fret all the time - even when they vibrate. This makes the fret work as a nut. The tone is preserved, but the tuning suffers since the strings are bent. The farther away from the fret you place the capo, the more you have to bend the strings to prevent them from buzzing against the fret.
|
 |
Now line up the edge of the capo along the top of the fret. The fret itself and the stiffness of the strings will prevent the capo from bending the strings. The tuning is preserved, but instead the strings are pressed into the soft pad resulting in muffled tone.
|
 |
Now tighten the capo harder - hard enough to bend the strings just a little over the fret. This will preserve both tone and tuning. As the strings dig into the pad, the edge of the pad will be stopped by the fret. This prevents the capo from being pressed down too far.
|
|
|
|
|
|
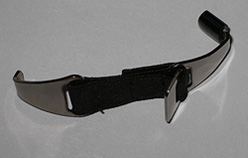
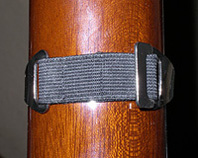
Detachable banjo 5th string capo
|
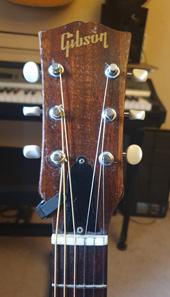
 I thought until recently that the only way to capo the 5th string on a 5 string banjo was to use one of these Shubb slider capos... I thought until recently that the only way to capo the 5th string on a 5 string banjo was to use one of these Shubb slider capos...
However, having just bought a Gibson Mastertone and not wanting to drill holes in the precious instrument (and not wanting this clunky bit of hardware in my face all the time!), I had a look to see if there was an alternative.
Below is what I found on ebay. You can buy them for about £12.50 each and are only (as far as I know) available from one guy. Click here to go to his ebay items for sale. They are not always there, but they do appear from time to time so check back.
Much to my surprise it doesn't scratch or harm the banjo in any way as there is only elastic in contact with the back of the neck. It is easy to put on and take off.. no more hassle than the Shubb slider variety.
The only worry is that it's so small that you might end up losing it or worse still - forgetting to take it to a gig. That's why I bought a spare just to leave in the case. Can you imagine forgetting it, having to retune your 5th string instead of capoing it and trying to figure out the new fingering as you go along?... oh God no!
|
|
|
Tunings
|
Guitar tunings can make life very interesting when you want to find something a bit different. Move the goal posts and you can inadvertantly score with ease. Your ears may be more creative when your hands don't know where to go!
I used to change tuning nearly every number and many of the songs and instrumentals that I have done would have been impossible without their special tuning.
Basically you can tune the guitar to whatever notes you like. You are only limited by the gauge of the string. Too low and the string flaps about. Too high and ptang!!
The strings of a guitar are numbered 1-6 from the top to the bottom. However... the notes of the tunings go from bottom to top (just to be awkward).
So.. one of the most common tunings (DADGAD) goes like this:-
6th = D, 5th = A, 4th = D, 3rd = G, 2nd = A, 1st = D
Here are one or two weird ones I have made use of over the years:
FACACE (I Don't Know)
GCDGBD (Foxtrot)
DAC#AC#E (Can You Tell Me)
GADGBE (Autumn Love Skip)
DADGAE (Let Me Sing You Psalms)
DADF#BF# (The Last Girl)
GCDGBD (Five Knuckle Shuffle)
GADGBD (You I Love You)
EAE<lowB>BE, EAEEBE (Nose rag)
EABEBE (Jitterbug)
More recently -
DADGCE (Long Way Back)
DADEAC#
(I'll Be With You)
and of course my 12 string fifths tuning, which I haven't yet seen anyone else use:
G#/C#/C#/F#/F#/B/B/E/D#/G#/G#/C# (more on this)
One word of warning though - if you do use different tunings, it might sound beautiful when you write it but sound hideous when you're under pressure and can't get the thing in tune onstage!
|
|
|
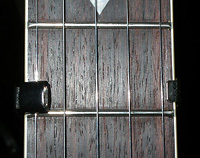
Tuners
|
   This D'Addario tuner is great and is so small, that you hardly notice it when you watch someone using one. This D'Addario tuner is great and is so small, that you hardly notice it when you watch someone using one.
It can clip on anywhere useful and doesn't leave any marks.
As you can see, I put mine just behind the headstock where you can easily check your tuning and it just looks like you are tuning by ear and looking at your tuners!
|
|
|
Hammer off & get a plucked note
|
This is a trick Gordon Giltrap told me about.
If you grow your fingernails on your left hand to be exactly in line with the tips of your fingers instead of cutting them back short (like most serious guitar players do!), then you will be able to produce an extra plucked note with the fingernails on your left hand as you hammer off. In this way you can get some very rhythmic things happening like Gordon does.
The only thing to remember is that you must attend to your nails on your left hand fairly frequently in order to keep them the desired length - otherwise you'll have difficulty fretting anything at all!
|
|
|
Eliminating string noise on recordings
|
The squeaking noise from sliding up and down the guitar strings can get very irritating and a bit over the top on recordings where you have lots of movement from the fingering hand. It can be further accentuated by the use of a compressor on the recording.
You can minimize this noise by soaking your fingers in hot water - the hotter the better.
This makes hard fingertips temporarily soft and means they don't make such a good contact with wound guitar strings. It is a temporary solution though, and you'll have to keep soaking your fingers every 5 or 10 minutes if you're doing multiple takes.
Ah if only Segovia had recorded after doing the washing up...!
|
|
|
String pegs - keeping them down
|
Most acoustic guitars use plastic pegs to anchor the strings in the holes on the bridge. Unfortunately with the passage of time, the holes and/or the pegs can become worn - the result being that when you tighten the strings to pitch, the pegs rise up and can be very difficult to persuade to stay in their holes!
To correct this, file the bottom of the pegs so that they are bevelled (i.e. at an angle of 45 degrees) instead of straight across.
This will enable the string to slide into the correct position instead of trying to push the peg out.
|
|
|
Scratches - on plastic
|
Scratch plates are so-called as they are there to protect the front of the guitar from thrash damage from picks. They are not supposed to look scratched. However I have managed to scar a couple of scratch plates deeply in my time, usually by clumsily trying to fit pickups over the sound hole.
It is only plastic and it can be taken down with progressively finer and finer wet and dry paper until the scratch is gone and you are left with a rough area on the plate.
The final magic touch is to use some of this stuff...
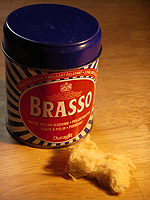 |
Just in case this is not universally known, it is basically metal polish wadding. It is an extremely fine abrasive and works on the plastic scratch plate the same as on silver and brass - by taking some of the surface off.
However it does it so slowly that you do have to keep at it for some time before the shine will come back.
I've even used this on a digital camera's scratched LCD with success!
|
|
|
|
Scratchplate removal
|
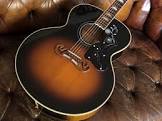
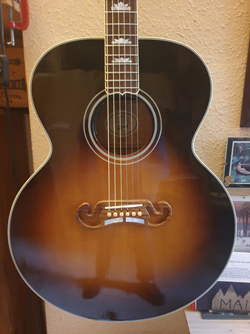 This is my J200 which was brand new and came equipped with the only thing I didn't like about it... the famous J200 scratchplate. This is my J200 which was brand new and came equipped with the only thing I didn't like about it... the famous J200 scratchplate.
I am a picker and hardly ever strum at all, so I looked into what I could do to restore it to the original tobacco sunburst but without the hideous floral adornment!
The solution worked a treat with this new instrument but I'm not sure it would be as successful with an older one.
The answer was to gently lift the scratch plate with a palette knife whilst gently blowing warm air with a hair dryer into the expanding gap between the body and the plastic plate to melt the glue. It took a little time and I definitely recommend you don't rush this!
The result is that it now looks absolutely gorgeous, and I wouldn't be surprised if it helped the sound too!
|
|
|
Scratches - from belt buckles
|
You can buy a protective pad to stick on the back of your precious guitar, however a cheaper solution (without buying one of these things) is to pull your shirt out and wrap it round the buckle before playing the guitar standing up. Works for me! Alternatively stop posing and sit down.
|
|
|
12 string tuning confusion
|
There is a problem having so many machine heads all in a long line and being able to keep track of which one belongs to which string - especially if you're under pressure and you're trying to tune quickly. Lord knows it's hard enough to get the guitar in tune at all without the added complication of turning the wrong machine head and wondering why the string isn't moving.
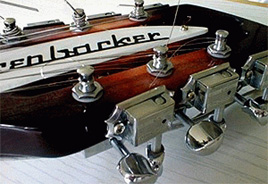 Rickenbacker had a brilliant design for their 12 string machine head arrangement, which was to put six of them pointing backwards classical fashion and six of them pointing sideways. However, as most of us don't own Rickenbackers we have to think of something else. Rickenbacker had a brilliant design for their 12 string machine head arrangement, which was to put six of them pointing backwards classical fashion and six of them pointing sideways. However, as most of us don't own Rickenbackers we have to think of something else.
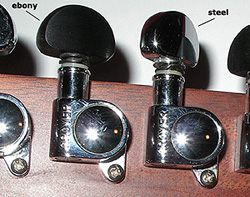 One answer which I have come up with is to make the octave (alternate) machine heads look or feel a bit different. You could paint them or file them. In my case, I have 12 mini Grover machine heads on my Taylor and I have replaced the steel buttons (the bit you hold) on six of them with ebony ones which you can buy for about a fiver. One answer which I have come up with is to make the octave (alternate) machine heads look or feel a bit different. You could paint them or file them. In my case, I have 12 mini Grover machine heads on my Taylor and I have replaced the steel buttons (the bit you hold) on six of them with ebony ones which you can buy for about a fiver.
However you do it, this is only the groundwork. You then have to train yourself to actually use the visual and/or tactile indicators, instead of grabbing indiscriminately!
|
|
|
Recording acoustic guitars
|
Firstly use a decent sounding guitar. Change the strings if they need it and use a good microphone (I use mainly an AKG C451E for my acoustic guitars), and experiment with the positioning to find the best place for the mike. Please don't use your guitar's pickup for recording! I usually position the mike down towards the bridge end of the sound hole, pointing upwards towards the sound hole and about a foot away. Record it flat, then listen back to it on speakers that do not colour the sound too much. Then you can then change the sound as much as you like. I usually want as natural acoustic sound as possible and a condenser mike like my AKG will pick up lots of crisp top but I might have to roll off some bass if I position the mike too near the sound hole of my old J45.
|
|
|
Recording effects on acoustic guitars with live vocal
|
The main difficulty with recording acoustic guitar and vocal is spillage between the vocal and guitar tracks. You will always get a bit of vocal on the guitar track and vice versa. If I want an effect like chorus or delay only on the guitar track whilst singing, how do I avoid the effect spilling over onto the vocal track?
The answer is to use your acoustic guitar's pickup and record the acoustic guitar on 2 tracks. You use a miked track as the main guitar track but you can feed your line output into any effects you want to use and return it back separately into your track.
You can then add as much or as little of the effect as you want and it won't effect the vocal track.
|
|
|
Recording acoustic bass guitars
|
Boo's acoustic Martin bass sounds beautiful when we play live... when it usually goes through an Acus 200w acoustic amp. But recording it is a different matter. The Fishman pickup on its own sounds too bassy and I haven't found a good sound by miking up the amp either. So... I record the guitar acoustically using a Neumann TLM103 about a foot away from the soundhole whilst recording the pickup direct to a separate channel.
I can then mix the 2 channels together or leave them separate (anywhere from mono to wide stereo) with the pickup supplying a lovely soft bass and the mike picking up most of the natural string transients.
|
|
|
Guitar case accidents
|
A good way of damaging guitars is to put them in their case temporarily (like at a gig) leaving the case unfastened. Someone then comes along, wants to move the guitar case and picks it up by the handle. Out topples the guitar...
The moral of the story? Always close one of the catches (the middle one) when you put the guitar in its case even for the shortest time.
|
|
|
Staying in tune after tuning
|
Why does the guitar go out of tune after you've tuned it? Usually it's because you've tuned a string down to the correct pitch but there's still some slack left which hasn't been taken up by the string below the nut... until you start playing. This can happen not just with complete retunings but even with the tiniest little adjustments downwards.
It might be because of friction where the string passes through the slot in the nut (this can be helped by lubricating the slot) or it might be due to the winding round the machine head. Who knows?
I've had the habit for many years now of giving the detuned string a little push with the right hand until it's below the note. Then tune it up rather than down. It doesn't take any longer than usual once you get used to it. The right push can be done as you detune with your left, pluck with your right, tune up with your left.
|
|
|
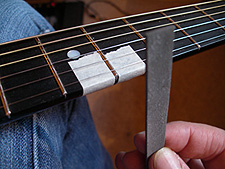
Frets - sharp ends
|
 My guitar has felt perfect over a year's playing, but recently I became aware of the frets protruding out the sides of the neck. I can only put this down to the incredibly cold weather and the increased heating in the house making the air much drier which makes the wood shrink. You can wait for the weather to pick up or get a humidifier and maybe the frets will slot back in. But maybe not... particularly with ebony fretboards, which is what I've got. My guitar has felt perfect over a year's playing, but recently I became aware of the frets protruding out the sides of the neck. I can only put this down to the incredibly cold weather and the increased heating in the house making the air much drier which makes the wood shrink. You can wait for the weather to pick up or get a humidifier and maybe the frets will slot back in. But maybe not... particularly with ebony fretboards, which is what I've got.
The normally gorgeous neck suddenly felt quite hostile with little sharp fret ends catching my hand as it moved up and down. Obviously these had to be filed down, so the problem was not what to do but how to do it without removing the guitar's finish.
My cheapo DIY answer was to put masking tape right up to each side of the offending fret(s) and use a smallish flat file perpendicular to the fret to take off the excess. This way you protect the finish and you can file off any protruding fret until you start filing down the masking tape - which is when you stop! Round the fret off and use some fine wet and dry to make the fret feel perfect again, but be very careful. It's still very easy to scratch the neck. Take your time and when you've finished, a little linseed oil rubbed into the fretboard will help keep the wood supple.
|
|
|
|
|
|
|
|